

Prepared by Steven W. Ritchie, former agronomy research assistant; John J. Hanway, professor of agronomy, retired; and Garren 0. Benson, extension agronomist.

J. Clayton Herman, editor; photography ISU Photo Service;
technical assistance from Steven J. Lupkes, agronomy research associate. Hypermedia version by Ricardo J. Salvador, with technical assistance from Robert Satter, William Miller, Aaron Kitzman, and the Facilities of the Raymond and Mary Baker Multimedia Laboratory
Copyright, 1992, Iowa State University of Science and Technology.
It is a manufacturing community with many thousands of highly organized and highly efficient "factories" per hectare or acre. Basically, the raw materials for the factories (plants) are water and mineral nutrients from the soil and carbon dioxide and oxygen from the atmosphere.
The internal machinery that transforms these raw materials into useful products (yield) is powered by sunlight. The products, called dry matter, consist of different combinations of carbohydrates, proteins, oils, and the mineral nutrients. Differences in growth and yield between hybrids are a result of differences in factory internal machinery.
The overall concept of corn production is that the raw materials and sunlight (power), combine with the internal machinery of the hybrid being grown to yield dry matter. This means that growth and yield of a corn plant are functions of the plant's genetic potential to react to the environmental conditions under which the plant is grown.
Although nature provides the major portion of the environmental influence on corn growth and yield, a corn producer can manipulate the environment with proven managerial practices. Such operations include tillage and fertilization of the soil, irrigation, weed and insect control, and many other practices.
Combinations of these practices vary over different production situations and management levels.
Regardless of the specific situation. however, a producer needs to understand corn growth and development. A producer who understands the corn plant can use production practices more efficiently to obtain higher yields and profit.
This publication is designed to aid those involved in corn production to more fully understand how the corn plant develops. The content is both basic and applied. The basic information explains corn growth and development through one life cycle. Management Guides pinpoint practices needed for optimum plant growth and production.
 Return to Table of Contents
All normal corn plants follow this same general pattern of development, but the specific time interval between stages and total leaf numbers developed may vary between different hybrids, seasons, dates of planting, and locations. For example:
 |  |  |  |
Return to Table of Contents
Each leaf stage is defined according to the uppermost leaf whose leaf collar is visible. The first part of the collar that is visible is the back which appears as a discolored line between the leaf blade and leaf sheath, figs. 1 and 3 . The characteristically oval-shaped first leaf is a reference point for counting upward to the top visible leaf collar.
Beginning at about V6, however. increasing stalk and nodal root growth combine to tear the small lowest leaves from the plant. Degeneration and eventual loss of the leaves results. To determine the leaf stage after lower leaf loss, split the lower stalk lengthwise (see fig. 2 ) and inspect for internode elongation. The first node above the first elongated stalk internode generally is the fifth leaf node. This internode usually is about one centimeter (0.4 inch) in length. This fifth leaf node may be used as a replacement reference point for counting to the top leaf collar.
| Table 1. Vegetative and reproductive stages of a corn plant.* |
|---|
| Vegetative Stages |
| VE emergence |
| V1 first leaf |
| V2 second leaf |
| V3 third leaf |
| V(n) nth leaf |
| VT tasseling |
| Reproductive Stages |
| R1 silking |
| R2 blister |
| R3 milk |
| R4 dough |
| R5 dent |
| R6 physiological maturity |
*This system accurately identifies the stages of a corn plant. However, all plants in a given field will not be in the same stage at the same time. When staging a field of corn, each specific V or R stage is defined only when 50 percent or more of the plants in the field are in or beyond that stage.
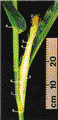
Return to Table of Contents , from the swollen kernel, followed by the coleoptile with the enclosed plumule (embryonic plant), and then the three to four lateral seminal roots. VE (emergence) is finally attained by rapid mesocotyl elongation which pushes the growing coleoptile to the soil surface, white line in fig. 5. Under warm, moist conditions, plant emergence will occur within 4 to 5 days after planting, but under cool or dry conditions, 2 weeks or longer may be required.
Upon emergence and exposure of the coleoptile tip to sunlight, coleoptile and mesocotyl elongation stops. At this time, the growing point (stem apex) of the plant is 2.5-3.8 cm (1-1', inches) below the soil surface and is located just above the mesocotyl. The rapidly developing embryonic leaves then grow through the coleoptilar tip and development of the above-ground plant follows.
Because the radicle and lateral seminal roots (collectively termed the seminal root system) begin growth directly from the seed, the soil depth at which they initially develop depends upon seed planting depth. Growth of these roots, however, slows soon after VE and is virtually non-existent by the V3 stage. Although the seminal root system continues to function throughout most of the corn plant's life, its most important contribution occurs before the nodal roots become well established .
The soil depth of the growing point at VE also marks the depth at which initial nodal root growth will begin. This depth (2.5-3.8 cm) is relatively constant over different planting depths due to mesocotyl elongation, see fig. 6  .
.
The nodal root system is initiated at about VE, and the first set (whorl) of nodal roots begins elongation from the first node during V1. From V1 to about R3 (after which there is very limited root growth), a set of nodal roots begins development at each progressively higher node on the stalk, up to 7 to 10 nodes total. The nodal root system becomes the major supplier of water and nutrients to the plant by the V6 stage.
All roots except the radicle, initially tend to grow at an angle of 25 to 30 degrees from horizontal. Initial radicle root growth, however, can be aimed in any direction (except up) by orienting the seed. Nodal root growth begins to turn more downward as temperatures increase and drying occurs in the upper soil layers.
Cool temperatures at planting generally restrict nutrient absorption from soil and cause slow growth. This can be partially eliminated by banding small amounts of fertilizer to the side and slightly below the seed. This banded fertilizer may be contacted by the seminal root system before VE.
For faster germination and emergence at early planting dates, shallow planting takes advantage of the more favorable soil temperatures near the soil surface. At late planting dates, soil temperatures are generally adequate throughout all planting depths and soil moisture content becomes the limiting factor for rapid growth. The deeper planting depths usually have better moisture content at late plantings unless recent rains have occurred.
Return to Table of Contents  Return to Table of Management Guides
 The dissected V3 plant, fig. 8
  , is shown with the leaves laid alternately (from side to side) in succession as they naturally appear on the intact corn plant. This same manner of display was used for all subsequent stages presented. Notice from the dissected V3 plant the stem apex (growing point) is still below the soil surface, and that very little stalk (stem) elongation has occurred.
Root hairs are growing from the nodal roots by this time, and growth of the seminal root system has virtually ceased.
All leaves and ear shoots that the plant will eventually produce are being initiated (formed) now. At about V5, leaf and ear shoot initiation will be complete and a microscopically small tassel is initiated in the stem apex tip. The stem apex at tassel initiation is just under or at the soil surface, although total above-ground plant height is about 20 cm (8 inches).
Destructive hail, wind or frost which damages the exposed leaves at V3 will have little or no effect on the below-ground growing point or final seed yield.
Flooding at any time when the growing point is below the water level can kill the corn plant in a few days, especially if temperatures are high.
Weed control reduces competition by weeds for light, water and nutrients. The use of chemicals, mechanical cultivation, and management practices such as higher plant densities or crop rotations, or combinations of these are effective weed control practices. Cultivation too deep or too near the plant after V2 will destroy some of the nodal root system; so cultivate cautiously.
Return to Table of Contents Return to Table of Management Guides and 10
  , the growing point and tassel
  are above the soil surface and the stalk is beginning a period of greatly increased elongation. Below ground, the nodal root system is now the major functioning root system with sets of roots elongating from the three to four lowest stalk nodes.
Some ear shoots or tillers, which initially look very similar. are visible at this time. They are displayed in the dissected plant (fig.10) just above the leaf that grew from the same node. Tillers (also termed suckers) will generally form at nodes originating below the soil surface, but may never show advanced development as in fig.14  . The degree of tiller development will vary with hybrid choice, plant density, fertility, and other environmental conditions.
Degeneration and loss of the two lowest leaves may have already occurred by the V8 stage.
Watch also for signs of insect damage such as lodged plants caused by rootworms or leaf feeding by corn borers.
Return to Table of Contents Return to Table of Management Guides Many ear shoots are now easily visible upon dissection of a V9 plant, fig. 13
  . An ear shoot (potential ear) will develop from every above-ground node, except the last six to eight nodes below the tassel. Initially, each ear shoot develops faster than the ear shoots originating above it on the stalk. However, growth of most lower stalk ear shoots eventually slows. and only the upper one or two ear shoots ever develop into a harvestable ear. Hybrids that produce more than one harvestable ear on the main stem are termed prolific. The tendency for a plant to display prolificness increases with low plant densities.
The tassel begins to develop rapidly now and the stalk is continuing rapid elongation. Stalk elongation actually occurs through elongation of its internodes. Each internode will begin elongation before the internode on the stalk above it, similar to initial ear shoot development.
By V10, the time between the appearance of new leaf stages will shorten, generally occurring every two to three days.
 and 54
  ). Soil nutrients and water supplies are now in greater demand to meet the needs of this increased growth rate.
Return to Table of Contents Return to Table of Management Guides
 |  |  |
 |  |
The number of rows of kernels per ear (fig. 18 ) has already been established, but the determination of the number of kernels per row will not be complete until about one week from silking or about V17.
The top ear shoot (fig. 19 ) is still smaller than the lower ear shoots at this time; however, many of the upper ears are close to the same size.
Return to Table of Contents Return to Table of Management Guides and 21
  is approximately 10-12 days (six V stages) away from the R1 (silking) stage. This stage is the beginning of the most crucial period of plant development in terms of seed yield determination.
Upper ear shoot development by V15 has surpassed that of the lower ear shoots, fig. 22  , and a new leaf stage is now occurring every 1-2 days. Silks are just beginning to grow from the upper ears at this time, fig. 23
  .
.
By V17 the upper ear shoots may have grown enough that their tips are visible (without dissection) at the top of the leaf sheaths that surround them. The tip of the tassel may also be visible at V17.
Return to Table of Contents Return to Table of Management Guides
 Details of the upper ear shoot and ear development are outlined in figs. 26
  and 27
  . Notice that silks from the basal ear ovules are first and silks from the ear tip ovules are last to elongate. The illustrations represent about eight to nine days of reproductive organ development.
Brace roots (also termed aerial nodal roots, fig. 31  ) are now growing from the nodes above the soil surface. They help support the plant and scavenge the upper soil layers for water and nutrients during the reproductive stages.
Stress during this time delays ear and ovule development more than tassel development. Delayed ear development will cause a lag between beginning pollen shed and beginning silk. If the stress is severe enough, it may delay silking until after pollen shed is partially or mostly through. The ovules that silk after pollen shed is finished will not be fertilized and will not contribute to yield.
Non-prolific (strongly single-eared) hybrids will gradually produce lower yields with increasing stress exposure, but may tend to yield higher than prolific hybrids unclear non-stress conditions. Prolific hybrids produce fairly stable yields under variable stress conditions (except under severe stress) because ear development is less inhibited by stress.
Return to Table of Contents Return to Table of Management Guides and 29
  ) is initiated when the last branch of the tassel is completely visible and the silks have not yet emerged (are not visible)
  . VT begins approximately 2-3 days before silk emergence, during which time the corn plant will almost attain its full height and pollen shed begins. The time between VT and R1 can fluctuate considerably depending on the hybrid and environmental conditions. Under field conditions, pollen shed (also termed pollen drop) usually occurs in the late mornings and early evenings.
The pollen shed period will extend for one to two weeks. During this time, each individual silk must emerge for pollination if a kernel is to develop.
Tassel growth and development are summarized in figs. 32  and 33
  from V9 through pollen shed. Figures 34
  and 35
  show a tassel segment before and during pollen shed.
Return to Table of Contents Return to Table of Management Guides
 . Pollination occurs when the falling pollen grains are caught by these new moist silks. A captured pollen grain takes about 24 hours to grow down the silk to the ovule where fertilization occurs and the ovule becomes a kernel. Generally 2-3 days are required for all silks on a single ear to be exposed and pollinated. The silks will grow from 2.5-3.8 cm (1-1.5 inches) each day and will continue to elongate until fertilized.
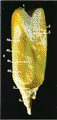
The R1 ovule or kernel is almost completely engulfed in the surrounding cob materials (technically termed the glumes, lemmas and paleas) and is white in color on the outside. The inner material of the R1 kernel is clear and has very little fluid present. The embryo or germ is not yet visible when dissected with a razor blade (see fig. 37  ). The shank and husks attain full size between the R1 and R2 stages.
Figure 37 displays (from left to right) the R1 kernel (1) with surrounding materials, (2) without surrounding materials, and (3) sliced through the middle to reveal the inner material. Figure 38  reveals the presence of silk hairs which help catch the pollen.
Environmental stress at this time causes poor pollination and seed set, especially moisture stress which tends to desiccate the silks and pollen grains. Stress will usually result in a nubbin, an ear with a barren tip.
Watch for corn rootworm beetles feeding on the silks and treat if necessary.
Potassium uptake is essentially complete, and nitrogen and phosphorus uptake are rapid. Leaf analysis for nutrients in the plant at this stage is highly correlated with final grain yield and yield response to fertilizer applications.
Return to Table of Contents Return to Table of Management Guides and 40
  . The endosperm and its now abundant inner fluid are clear in color and the tiny embryo can now be seen upon careful dissection. Although the embryo is still developing slowly at this time, the radicle, coleoptile, and first embryonic leaf have already formed. Thus, within the developing embryo is a developing miniature corn plant.
Much of the kernel has grown out from within the surrounding cob materials by R2 and the cob is close to or at full size. The silks. having completed their flowering function, are now darkening in color and beginning to dry out. The silk color is influenced by environmental conditions: hot, dry conditions cause darker silks.
Figure 40 displays (from left to right) the R2 kernel (1 ) with the surrounding materials, (2) intact as viewed from the opposite side from the embryo, (3) embryo side sliced longitudinally to reveal the front of the young embryo. and (4) sliced longitudinally through the center.
Figure 41  displays kernels from ears that were (from left to right) 7, 10, 12 (R2), and 1 8(R3) days after silking. Each row then corresponds to the same manner of kernel display as in fig. 40.
The kernels are now about 85 percent moisture, and their moisture percentage will gradually decline from here until harvest.
Return to Table of Contents Return to Table of Management Guides The R3 kernel displays yellow color on the outside, and the inner fluid is now milky white due to accumulating starch. Although initially slow to develop, the embryo is growing rapidly now and is easily seen upon dissection. Most of the R3 kernel has grown out from the surrounding cob materials and the silks at this time are brown and dry or becoming dry.
Figure 43  displays (from left to right) the R3 kernel (1) with surrounding materials, (2) intact as viewed from the opposite side from the embryo, (3) sliced longitudinally to reveal the front of the young embryo, and (4) sliced longitudinally through the center. Figure 44
  shows sliced ears from (left to right) R3, R4 and R5 stages.
Final yield depends on the number of kernels that develop and the final size or weight of the kernels. Although not as severe as at R1, stress now can still have a profound effect on yield by reducing both of these factors. As the kernels mature, the amount of potential yield reduction from stress becomes less.
Return to Table of Contents Return to Table of Management Guides Continued starch accumulation in the endosperm has now caused the milky inner fluid to thicken to a pasty consistency. Usually four embryonic leaves have formed by this time and the R4 embryo has greatly increased in size from the R3 stage. The shelled cob is a light red to pink color due to beginning color changes of the surrounding materials (lemmas and paleas).
Toward the middle of R4, the embryo side width will stretch across over half of the kernel side width. Kernels must be dissected longitudinally through the center as with the far right kernel in fig. 46  to observe this. The reduced fluid and increased solids within the kernel at this time produce a doughy consistency .
Just prior to R5. kernels along the length of the ear begin to dent or dry on top. The fifth and last embryonic leaf, and the lateral seminal roots have formed by this time. These five embryonic leaves are the same first leaves to appear the following season after germination and VE.
Return to Table of Contents Return to Table of Management Guides At R5, all or nearly all kernels are dented or denting and the shelled cob is dark red in color
  . The kernels are drying down now beginning at the top where a small hard white layer of starch is forming. This starch layer appears shortly after denting as a line across the kernel when it is viewed from the opposite embryo side (see fig. 49
  ). With maturity, the hard starch layer and line will advance toward the base of the kernel (toward the cob). Because the accumulated starch is hard above the line but still soft below the line, pressing the kernel with the thumbnail can aid its detection.
Figure 49 details starch line development with kernels and kernel slices from the R4 (left) and three progressively advanced R5 stages. The kernel slices were laterally cut from the top, middle and bottom areas of the kernel.
At the beginning of R5, kernels have about 55 percent moisture content.
Return to Table of Contents Return to Table of Management Guides , is reached when all kernels on the ear have attained their maximum dry weight or maximum dry matter accumulation The hard starch layer has advanced completely to the cob now and a black or brown abscission layer has formed, fig. 51
  . This black layer formation occurs progressively from the tip ear kernels to the basal kernels of the ear. It is also a good indication of maximum dry weight (physiological maturity), and signals the end of kernel growth for this season. The husks and many leaves are no longer green although the stalk may be.
Figure 52  displays an R6 kernel on the opposite embryo side (left) and slices laterally cut from the top, middle and bottom of the kernel.
Harvest silage at R6 or slightly earlier.
Return to Table of Contents Return to Table of Management GuidesThe leaves of the plant are produced first, followed by the leaf sheaths, stalk, husks, ear shank. silks, cob and finally the grain. By stage V10, enough leaves are exposed to sunlight so the rate of dry matter accumulation is rapid.
Under favorable conditions, this rapid rate of dry matter accumulation in the above-ground plant parts will continue at a nearly constant daily rate until near maturity (see fig. 53).
Cell division in the leaves occurs at the growing tip of the stem. Leaves enlarge, become green. and increase in dry weight as they emerge from the whorl and are exposed to light, but no cell division or enlargement occurs in the leaves after they are exposed. All leaves are full size by V12, but only about half of the leaves are exposed to sunlight.
If a corn plant is grown under low plant density, prolificness may result. Increasing the number of plants in a given area reduces the number of ears per plant and the number of kernels per ear. This reduction is greater for some hybrids than for others. Grain production per hectare (or acre) will increase with an increase in number of plants per hectare until the advantage of more plants per hectare is offset by the reduction in number of kernels per plant. The optimum plant population is different for different hybrids and in different environments.
Highest yields will be obtained only where environmental conditions are favorable at all stages of growth.
Unfavorable conditions in early growth stages may limit the size of the leaves (the photosynthetic factory). In later stages, unfavorable conditions may reduce the number of silks produced, result in poor pollination of the ovules and restrict the number of kernels that develop; or growth may stop prematurely and restrict the size of the kernels produced.
Return to Table of Contents
The seasonal pattern of nutrient accumulation in the plant is similar to that of dry matter accumulation (see fig. 54 ). However, nutrient uptake begins even before the plant emerges from the soil. The amounts of nutrients taken up early in the growing season are small, but the nutrient concentrations in the soil surrounding the roots of the small plant at that stage often must be high.
Uptake of potassium is completed soon after silking  , but uptake of the other essential nutrients such as nitrogen and phosphorus continues until near maturity. Much nitrogen and phosphorus and some other nutrients are translocated from vegetative plant parts to the developing grain later in the season. This translocation can result in nutrient deficiencies in the leaves unless adequate nutrients are available to the plant during that period.
A large portion of the nitrogen and phosphorus taken up by the plant is removed in the grain that is harvested But most of the potassium taken up is returned to the soil in the leaves, stalks, and other plant residues. unless these plant parts are removed for silage or other forms of feed.
Return to Table of ContentsDuring early growth, the root system is limited and the soil is often cold. The seminal (seed) root system which is elongating when the plant emerges from the soil serves as the main root system during the first weeks after plant emergence. Fertilizer placement in a band about 5.1 cm (2 inches) to the side and slightly below the seed is important so the seminal roots may intercept the band of fertilizer. Roots will branch and proliferate in and near the band of fertilizer after they contact it; but they are not attracted toward the fertilizer band, so fertilizer must be placed where the roots are going to be. Placing the fertilizer too near the seed can result in salt injury to the young plant.
At later stages of growth, the plants require much larger amounts of nutrients. These nutrients must be in moist soil for effective root uptake. For all tillage systems, a soil testing high in P and K should provide adequate nutrients and placement is not a major concern. For conservation tillage systems on soils low in P and K, a starter band or injection 6 to 8 inches deep may be advantageous over broadcast applications. Time and placement of nitrogen fertilizers should be based on greatest efficiency, minimizing potential loss, and fitting into the production system.
The nodal roots begin to develop above the coleoptile node at about VE. Within 2 or 3 weeks after plant emergence. the nodal roots become the main root system of the plant. This nodal root system becomes well distributed in the soil, so precise fertilizer placement is less critical after these roots have developed.
Care should be taken that roots are not destroyed by cultivation or by sidedressing of fertilizer after the root systems of the plants become established.
Return to Table of Contents
Return to Table of Contents Return to Table of Contents